

Ready for the next holiday? I love Valentine's Days. Pink, candy, hearts- all my favorite things. I saw a wreath similar to this project on Pinterest and decided to personalized it a bit to match the theme of my Valentine's party.
I actually love the color and material used on this wreath above but wanted to match the wreath to my valentine's party invitations (available here)

Supplies
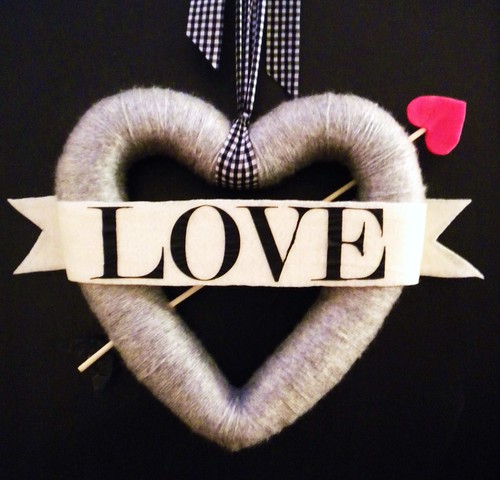
heart wreath, ribbon (about 1' wide for wrapping wreath and 2" wide for hanging wreath) lollipop sticks, wooden hearts, paint (if you need to paint the heart to match your wreath) glue and pins.

Attach the ribbon to the back of the heart with glue or a straight pin and wrap the ribbon around the wreath slightly overlapping the previous wrap. Continue until the whole wreath is covered with ribbon. If you have trouble keeping the ribbon flat, use the glue or pins on the back of the wreath to smooth the ribbon out.


Paint your heart the color you want it and attach it to the end of one of the sticks.

Make a small slit in the ribbon where you are putting the arrow through the heart. I used several sticks because I didn't have one that was long enough. I even have a small space in the middle which is fine because the banner covers it. Make sure you dip the ends of the stick into your glue so it stays secure.

Add the banner (which I printed on my computer than had enlarged onto cardstock at my local copy store) with pins or glue and a ribbon and hang!

If you make a wreath, send me a picture. I'd love to see them. Lots of Valentine's inspiration to come in the month ahead for my sweet readers.
XO


