Monday, April 23, 2012

Make It Monday- Family Photo Books

Don't forget to enter our Bulldogs and Bows giveaway!
Have you made a photo book yet?  They are a great way to organize your pictures and personalize them to a person or event.  Each year I make a book for each of my children and for our family.  The books for my kids go from birthday to birthday and our family book goes from September to August.  Since I started collecting photos for these books on my oldest daughter's first day of kindergarten, this made perfect sense.  Also, I give each of the books as presents to my kiddies and husband on Christmas, so ending our family book in August gives me time to create the album.  Honestly, everyone really looks forward to this present each year and it's a great final gift to get on Christmas morning.


There are many terrific sites on which you can create books.  I use Shutterfly because that's what I started on.  Don't get overwhelmed.  Start simple.  In my first book, I used all 12x12 photos and no added no writing just so I could get the hang of it.

Now in each of my children's books,  I do a short paragraph about their personalities, likes and activities over the previous year.  It's a great way to remember those little unique traits that they sometimes out grow.

Don't order a book without a coupon and free shipping!  Google discount codes for your site.  They frequently run specials and this will save you LOTS of money.  A final thing you may consider- I always order 2 of each book.  One for me that I save high up in the closest and one for little hands that are sometimes dirty and not always delicate but absolutely love to hold the book.  Then, I am not worried about the book getting ruined.
Off to a great week!
XO,
Jenny

Friday, April 20, 2012

Teacher Appreciation


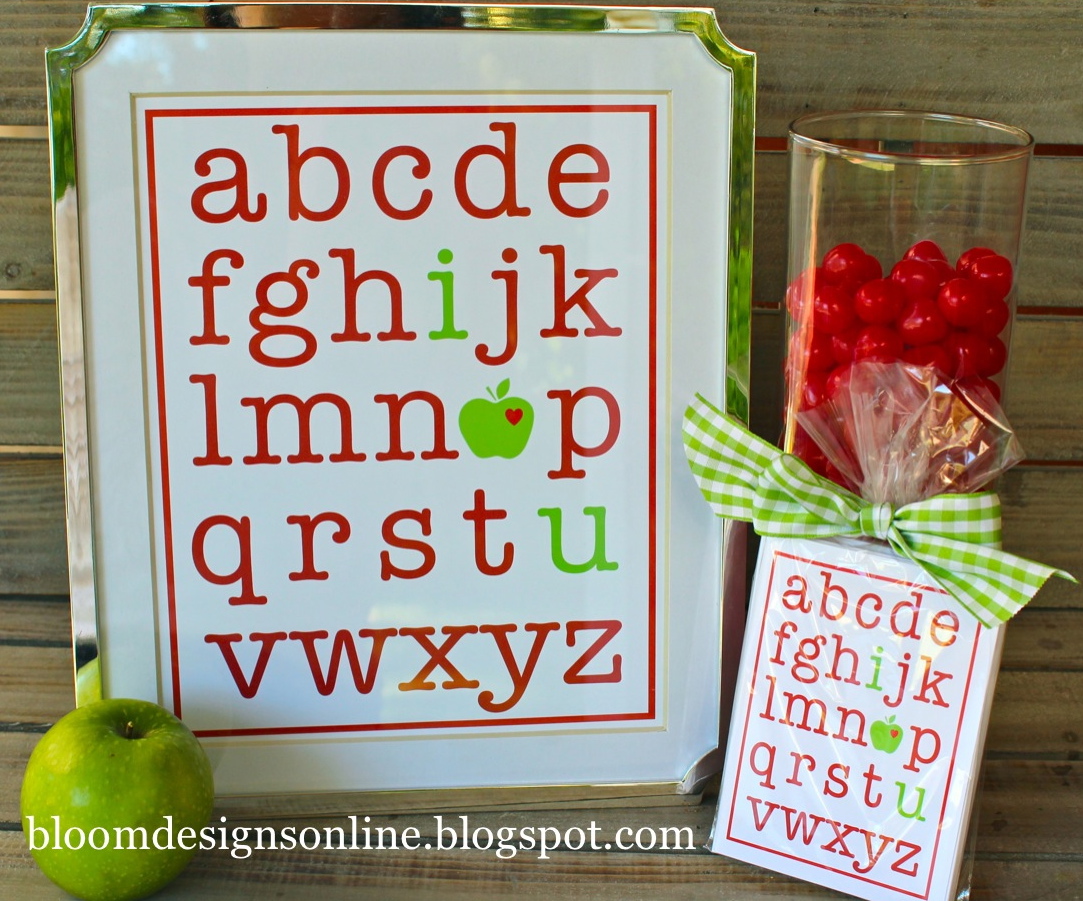
I can't believe that we only have a handful of weeks of school left.  I think I'm more excited for summer than my kids, actually.  Love those lazy days of sun and late mornings.  Anyways, this is the perfect time to honor the teachers in your life.  I used to be an elementary teacher before I had children and believe me, it is such a difficult job.  I thought a few minor tweaks on the alphabet word art that I shared would be the for Valentine's Day would make the perfect printable to show teachers how much we love and appreciate them.


Print as an 8x10 and pop in a pretty frame or 
print them as note cards on card stock, 
cut them out and fold into cards, 
add 3 1/2 x 5 envelopes available at paper source 
and you have a great little thank you gift!

This file available for download here.

Have an amazing weekend!
XO
Jenny

Wednesday, April 18, 2012

Bulldogs and Bows Giveaway and Link Party 8


I am so excited to share this amazing give away from Bulldogs and Bows. Are these not the cutest little outfits?! Bulldogs and Bows offers the most adorable hand smocked outfits for boys and girls ranging in age from 6 months to 5 year. They are the perfect little party attire.  Bulldogs and Bows was founded by Riley Leitner and Lacey Smith through their love of dressing their own little Bulldog and Bow wearing belle in smocked clothing.  Take a look at this adorable elephant themed birthday party that one of the owners just hosted for her daughter's one year old birthday.


The outfit is truly the "icing on the cake'.  I have to say though, with summer on my mind,  Bulldogs and Bows offers the sweetest swim suits.  Hop on over and visit their store, www.bulldogsandbows.com.

For this giveaway, Bulldogs and Bows if offer one lucky Bloom reader an elephant birthday outfit in your choice of size.
Good Luck! (really wish I could win).  To win you must like Bulldogs and Bows on Facebook below.


a Rafflecopter giveaway


Ready for the link party? WOW! Last week we doubled our amount of entries. The most viewed entry was

Popcorn Candy Crack by Michelle's Tasty Creations

Congratulations Michelle- Make sure to grab your button!


This is your chance to share something YOU created on my blog.  I would love for you to share your parties, creative holiday ideas, and favors. Really, I would love to see anything pretty.  Next week, I will highlight some of the most viewed links. 

HOWEVER,  if you want to be featured, you must have a link back (text hyperlink or my linked button) to my site on your blog. Thank you!


 A few rules:
1. Please be a follower of Bloom Designs Online (a member in bloom)
2. Link directly to your idea not your home page.
3. Insert a text hyperlink back to my blog or grab my button.
4. No Etsy shops, giveaways or personal link parties.


<a border="0" href="http://bloomdesignsonline.blogspot.com/" target="_blank"><img 


Thanks! So excited to see your ideas.
XO,
Jenny

Party Planning 101- Dessert Tables

When planning a party, the one thing that I usually get stuck on is the layout of the dessert table.  First, I want to share that I am approaching this from an art history perspective since that was my major in college.  I look at dessert tables like a piece of art, a sculpture perhaps. So, when I talk about things like negative space, texture, balance, color and movement, I'm not a total nut- my brain has just been conditioned to see those things.  You may use totally different thinking when setting up your table.

Negative space

By Amy Atlas

The negative space on a dessert table is just as important as the sweet treats.  Your eye needs a place to rest.  Darling desserts can't shine if there are simply too many of them.  Edit your ideas.  Choose the best and give them so space to breathe. Don't create chaos.

Texture

By Amy Atlas

This is probably the easiest element.  Choose dessert of various sizes and shapes (unless of course if polka dot is you theme) to add interest to your table.

Balance- symmetrical vs. asymmetrical

Symmetrical


If you are new to party hosting or don't have a ton of self confidence in what you doing, a symmetrical table is the safest choice.  This automatically give your table balance since things on both sides are identical. Symmetry is peaceful, solid, and orderly.  Pick a larger item for the center of the table and match your servings vessels on each side.

Asymmetrical


This is a bit trickier because you want your table to look balanced. However, where symmetrical can sometimes become boring and a bit lifeless, an asymmetrical table can be more interesting and have a better sense of movement.  You can make the eye flow around the table with strategic use of color and height.  In the next picture, do you see how the tall wooden cake stand draws your eye from the center of the table up and the bright red licorice and gumballs pulls it back down.


This asymmetrical table is beyond amazing!

By Just Call Me Martha

Finally, a note on height,
I often hear people say you need to add lots of riser and height to a dessert table.  Not so!  It goes back to negative space, sometime you need that open area.  The perfect example is my most favorite dessert table of all time, by the amazing Amy Atlas.


Thanks for reading this mini art lesson.  I was an elementary teacher in my earlier life.  
If you didn't get a chance to read earlier party planning 101 posts, click here, here, here, here or here
Fabulous giveaway and link party tomorrow!
XO,
Jenny

Tuesday, April 17, 2012

Pretty Perfect

Pretty Perfect is back this week with some of my favorite party photos found around the web.  Usually, I try to post this each Tuesday but some weeks are less thrilling than others.  I  don't like wasting your time with things that aren't totally amazing and inspiring.  Sometimes I choose things that take my breathe away and sometimes they just get my mind clicking.

Breakfast at Tiffany's Party from HWTM
There is such amazing attention to detail put into this party. It is so prim. proper, fancy and over the top.  Every little girl should have a party like this at least once! The predominately black and white color scheme with aqua keeps it classy.

Sweet Reader Submission- Ride with Riley

This next party came to us from a bloom reader (and dear friend) Alison, whose daughter loves horseback riding.  This is a great party theme that we don't often see and Alison did such an amazing job! I love the pink, mint and brown color scheme, cute food names and fun horse inspired activities. The girls had a ball running through the equestrian course on their "horses." ADORABLE!


Send me your party, wedding or shower submissions.  I would love to share.
XO
Jenny

Monday, April 16, 2012

Make It Monday- Banana Creme Pie Minis & Whipped Cream

Happy Monday! Hope you had a great weekend.  The weather cleared and it was clean and beautiful here.  Can't wait for summer.


I have a handful of yummy desserts that I always use for parties.  I really need to find some new "go tos" because I'm sure my friends are getting tired of me bringing the same things but with my 1952 oven that doesn't seal, I simply don't have the motivation.  Luckily, these treats are fabulous, extremely quick and simple. I am also including the recipe for the most amazing whip cream.  Really you won't want to buy pre-made again.  This is so fast and yummy.

You need to make the mini banana creme pies eight hours to a day ahead so that the cookie has time to soften and the flavors can blend.  You can also make it in a big casserole dish to simply scoop and serve using the same steps.

Whipped Cream

You need: 
2 cups heavy whipping cream
1 cup powdered sugar
1 teaspoon vanilla
A standing mixer. I hate to say it but if you don't have a standing mixer (Kitchen Aide) is won't come out nearly as good.  You won't be able to get the volume or whip that you need.  It will be OK but really there is a big difference.

Add all the ingredients to the mixer attached with your whip and slowly start to mix.  Once all the powdered sugar is incorporated, turn to high and whip away.  Don't walk away- it will separate into curds if you let it go to long.  It should be thicker than generic shaving cream.  Put the whipped cream into a piping bag (or bowl if you are using it for another recipe) and it will save for a good 24 hours- probably longer but I have never tried.


Banana Creme Pie
You need:
instant banana pudding (yes I have made it from scratch, but honestly, it doesn't taste better so save some time),
whole milk
caramel sauce
whipped cream
mini and regular sized vanilla wafers (if you only want to buy 1 box- get the minis)
mini plastic cup (these are from Party City) and
bananas which I forgot to put in the picture above but are definitely the most important part of this dessert

Prepare pudding as directed on package for pie, not pudding.  I use slight less milk so that my pudding is thicker.  Put pudding into a piping bag. Any tip will work.  This is just to make it easier and quicker to get it into the cups. 
 Put just a little dollop of pudding into the cups to seal the cookie on the bottom. 

Put on mini cookie over it and press down.  

Put a another dollop of pudding on top of the cookie.  Add a banana slice (approx. 1/4 inch thick) and again push down.  You don't want huge spaces of pudding.  Fill any space around the banana with pudding and cover the top of the banana with with another small dollop. 

Add a regular sized wafer (or a mini and a half of a mini) and push down.  Add a thin zigzag of caramel (the secret yum ingredient).  Just a little! Too much will take away from the pie but just a little really make this dessert stand out!  

Repeat the banana step but then fill to the top of your cup with pudding.  Make sure to cover the banana so it doesn't brown.


 Seal the entire dessert with your whipped cream and top with a mini wafer. 


Make sure to pin it! 
Have a great week.  Back tomorrow!
XO,
Jenny