Showing posts with label apple of our eye. Show all posts
Monday, April 9, 2012
Make It Monday- Lemonade Stand
Happy Monday- I spent last week at the beach playing with my family. I can't wait for summer and the warm southern California weather to kick in. So, it's lemonade week on Bloom and what better way to start things off than with an amazing lemonade stand tutorial. Before you click off thinking that it will take forever, I want you to know that this stand took me less than 2 hours to build.
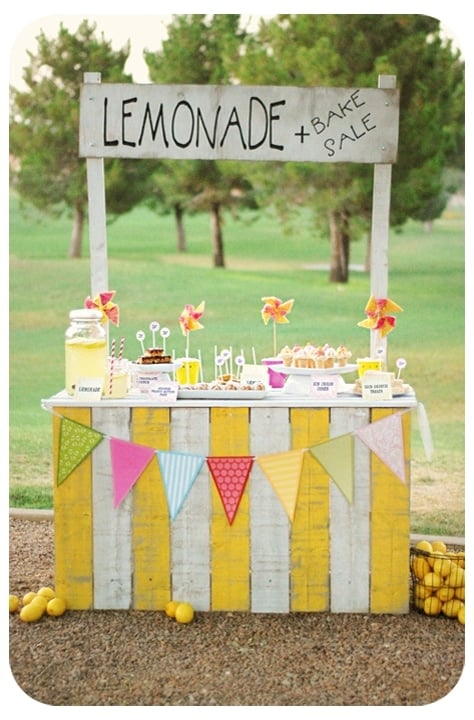
When I was looking for a farm stand for Charlotte's birthday party, I found this adorable photo on Pinterest. It took me to Lil Luna and I've been a fan ever since. I've emailed with the lady behind Lil Luna, Kristyn, a handful of times and she is an incredibly sweet, down to earth, adorable person- a new friend. You will love her blog!
So, I followed most of Lil Luna's directions for a lemonade stand, which you can find by clicking here but I made a few changes that suited my party a bit better. My secrets-
1. I didn't need to antique my stand since that wasn't the look of my party. The crisp hot pink and white worked great.
2. I had all the wood cut at Home Depot when I bought it. They will do this for free. I took in all the measurements with me and they did the real work. When I got home, all I really had to do was paint the boards (with a big roller) and screw the pieces together. This step requires a bit of preplanning and math but it saved me soooooo much time.
3. My stand is obviously longer than Lil Luna's. Decide on the length you want. Adjust the length of the front 2x4s and increase the amount of planks that you need.
4. I did not use glue, or counter sink or make corner brackets- I'm sure Lil Luna's stand will last much longer than mine. I did use drywall screw to attach everything.
5. I simply screwed the posts for the sign into the back 2x4 eliminating the need to make slits for the post. My skills are not at that level:)
6. Like Lil Luna, I had a vinyl decal made for the lettering. You could easily hand paint it but I am much too impatient. Maybe someday.
Add the adorable party bunting we made last week:) and let the kids have fun!
Now that the Apple of Our Eye Party is over, my kiddos have new plans for the stand. We are repainting and using it for a future project. Concessions anyone? Photos coming soon. See you tomorrow.
XO,
Jenny
Sunday, April 1, 2012
Make It Monday- Party Bunting
Happy Monday! I love this bunting and have seen variations of it used at many parties. It is an amazingly simple to make and extremely versatile. This bunting can be done in any size, length or color. I really can't think of a party it wouldn't work. Even better, after a quick lesson, my 10 year old daughter and her BFF made this for me. I'm sure you could find some little hands willing to help!
Supplies-
Different fabrics- as many as you would like to use in as many colors you would like to use.
Ribbon- long enough to cover your space. If you want the bunting to drape, make sure you account for that in your measurement.
Pull the loose ends of the fabric over the ribbon and through the loop.
Pull taunt but not tight.
You still have time to make it for your Easter table!
Thanks for participating in the giveaways last week. All winners will be announced on Friday! Have a great week.
XO
Supplies-
Different fabrics- as many as you would like to use in as many colors you would like to use.
Ribbon- long enough to cover your space. If you want the bunting to drape, make sure you account for that in your measurement.
Cut into strips. Mine were roughly 2 inches each wide. You will need the length to be roughly 2 times the desired finished length plus 3 inches (for the knot).
Leave enough ribbon on one end to tie your bunting onto a table or nail. Fold the bunting in half. Place it under the ribbon.Pull the loose ends of the fabric over the ribbon and through the loop.
Pull taunt but not tight.
Continue on moving the streamers closer together as necessary and trim any lenghts that look funny.
You still have time to make it for your Easter table!
Thanks for participating in the giveaways last week. All winners will be announced on Friday! Have a great week.
Friday, March 23, 2012
Apple of Our Eye Party
Finally, it's time to share my daughter, Charlotte's Apple of My Eye Party on my blog! I was going to wait until the party planning series is over but I have a lot more to say and I can't wait any longer to share these photos with you.
I created this Apple of Our Eye party for my daughter, Charlotte’s, sixth birthday. I did not want the party to feel like a harvest so I incorporated crisp, modern printables and a preppy bright pink and apple green color scheme.
When the little guests arrived for lunch, they untied their apple baskets from the backs of their chairs and dined on applewiches, harvest chips, mac ‘n cheese, apple sauce and of course a crisp green apple. They sipped on apple juice and lemonade served in glass jars. Each girl had an apple of our eye gumball tube at her place setting. To make the placemats, I simply made a document on word and then had it enlarged on thick glossy cardstock at my local printers
After lunch the girls did apple of my eye make up, made paper mache apples using left over fabric from the bunting and made apple necklaces. They also made their own mini apple pies in mason jars that we called, Charlie Pies- my daughter’s nickname.
The girls treated themselves at the farm stand, which was filled with apple cake pops, apple cupcakes, applejacks, and candy apples. There was also ice cream scooped in candy cup and shaped to look like apples complete with wooden stem or spoon. They also loved the M&M apples done in baking cups as well.
Party favors were apple of my eye t-shirts.
| lime sherbet with wooded spoons for stems |
| favors were apple of our eye tshirts |
| I made this placement on my compute,r then had the copy store enlarge it on glossy cardstock |

The complete line of printables, the chevron sandwich bags, baking cups and straws are available in my etsy store. HAVE A GREAT WEEKEND!
Subscribe to:
Posts (Atom)


