Showing posts with label make it monday. Show all posts

Monday, January 28, 2013

"Soup"er Bowl Chili


Do you have football fever?  My favorite part of the Super Bowl is the food.  I love snuggling in with a big spread of yummy appetizers, comfort food and a few great friends to cheer on my favorite team.

What better to serve at your Super Bowl party than a hearty, rich chili.  This recipe is amazingly easy but so delicious.  Make it ahead of time to reduce game game stress and of course serve it in these soup-er bowls!


For 49er Chili you need:
10 Servings

2 tablespoon butter
2 tablespoons corn oil
2 large sweet onions, chopped
2 pounds lean ground beef
3 cloves garlic, minced
1 teaspoon salt
2 teaspoons freshly ground black pepper
1-1/4 cups catsup
1 teaspoon dried, crushed red chilies
3 tablespoons chili powder (or more to taste)
1 tablespoon ground cumin
1 28-ounce can diced tomatoes, with juice
1 28-ounce and 1 15-ounce can crushed tomatoes, with juice
1 28-ounce can pinto beans, with juice
1 15-ounce can pinto beans, with juice
2 tablespoons brown sugar
3 tablespoons tomato paste
Suggested garnishes: chopped onion, sour cream, grated Cheddar or Monterey Jack cheese, jalapenos.

Direction:


  • Heat butter and oil in soup pot and saute onions. Add ground beef, cook through, and add garlic, cooking another 3 minutes.
  • Add all remaining ingredients and cook, stirring often, over medium heat for at least an hour so flavors blend.
  • Serve with a variety of toppings.
This also freezes great! Ready to get your game on?  Off to a great week.

XO,
Jenny

and thanks to my husband for typing this recipe.  My fingers were much too tired:)

Sunday, December 30, 2012

Make It Monday- Resolution Cards

Posting early so you have time to print these:)

I am a big believer in setting goals.  Like the phrase in the movie, Field of Dreams, if you build it (or set them), they will come.   When I started Bloom just over a year ago, I definitely had several goals that I wanted to accomplish.  Looking back, I smile at all of my goals that have become realities.  Thank you for supporting Bloom in 2012!  

These little cards are a great activity for adults and kids. Depending on the mood, they can be lighted hearted or quite reflective. Have fun looking back and forward!


Available in three color schemes to match your party.


 click here for pink
 click here for bright
Time to dream bigger.  To lots more celebrations in 2013...
XO,
Jenny

Monday, December 24, 2012

Make It Monday- Sweet Memories

My Sweet Readers,
I hope you spend today making sweet memories with your loved ones.  I will be snuggling with these precious babies, eating yummy treats and participating in annual Christmas traditions that I hope will continue for decades to come.  Thank you so much for spending time in Bloom. Thanks for you friendship and support!  God bless each and every one of you.
A very merry Christmas,
XO,
Jenny

Monday, December 10, 2012

Make It Monday- Present Toppers


This craft is a combination of a few ideas I liked on Pinterest.  In less than five minutes, you can add a little extra shine and personality to your gifts.  Simply attach a rubber animal to a clothes pin with your glue gun.  Spray paint. All supplies were found at Michaels.


Super great giveaway at the end of the week.
XO,
Jenny

Monday, December 3, 2012

Make It Monday- Easy Chocolate Peppermint Pretzels

Are you feeling the Christmas crunch yet?  We had a super busy weekend around here so I needed to come up with a quick and easy hostess gift for a party this week.  These chocolate peppermint pretzels will take you less than 10 minutes to make.  They are yummy and pretty (they actually look better than the photos)!  I stuck them in a nice glass jar to take to my party.  I especially love this recipe because you can easily adaptable to any event.  I made them with pink sanding sugar for my daughter's birthday.  Pin this recipe for future reference.

You need white chocolate (or yogurt) covered pretzels and candy canes

Preheat your oven to 250 degrees. Put candy canes in a Ziploc and crush i to a pretty fine powder. 
Place pretzels in a single layer on a parchment covered cookie sheet.
Place in oven for about 2 minutes to soften chocolate.
Sprinkle pretzels with candy canes.  Place in refrigerator for a few minutes until set.
Package individually or in bulk.

On a personal note, thanks for helping Bloom reach 1,000 sales in my Etsy Store and thanks to my sweet husband for surprising me with the cake below.
Have a super sweet week!
XO,
Jenny

Monday, November 26, 2012

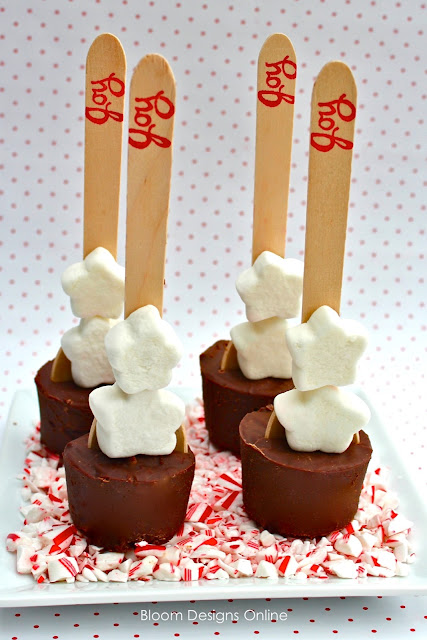
Make It Monday- Hot Chocolate Spoons Part 1

There are lots of ways to make these fun hot chocolate spoons!  I have seen the chocolate blocks on wooden sticks, on silver spoons and even just cut into cubes.  This is my version. I wanted to use wooden spoons available here stamped with the word joy but I

Monday, November 19, 2012

Make It Monday- Mini Caramel Pecan Apple Pies

Are you looking for one more Thanksgiving treat?  This is the only apple pie I like.  The salted caramel, pecans and crumb topping make these little treats divine.  Of course you can make one big pie,

Monday, October 8, 2012

Make It Monday- Mummy Lanterns

I found lots of inspiration for these lanterns on Pinterest.  My daughter and I made big versions of these for the front porch.  It reminded me how much I love cheesecloth for Halloween.  You can wrap anything with it for a spooky effect.  Remember the cheesecloth wreath I made last Halloween (tutorial here)?

Use cheesecloth to wrap any bottle, including soda bottles, for a quick, fun decoration.

You need
cheesecloth
goggley eyes
water based glue so it will wash off after Halloween
glass hurricanes
Cut your cheesecloth into 2 inch strips.
Use a dab of glue to secure the end of the cheese cloth to the hurricane
Wrap the cheesecloth around the hurricane.  Tie the pieces together to create a mummy effect.  Add in extra ties if you need more.
Glue on the eye.  All done!
Have a great week!
XO,
Jenny

Monday, October 1, 2012

Make It Monday- Marshmallow Bones

The last time I made these were for my daughter's sixth birthday.  She going eleven in a few weeks.  I can't believe how big she is!  Anyways...

Homemade marshmallows taste so much better than store bought.  They are almost like a completely different item.  They're pretty easy to make if you have a candy thermometer and standing mixer.  Bones are the perfect shape for Halloween but you can also simply spread the mix in a pan and cut into squares or circles.  You can also mix in food coloring as needed.

Sunday, September 23, 2012

Make It Monday- Ghostly Grub

If you could quickly hop over to Project Nursery and vote for my Baby B party as project of the month I would really appreciate it.  Just click here, then scroll down and click Baby B, then vote.  It takes just 15 seconds.  THANKS!


If you've read my blog of any amount of time, you must have anticipated this post!  Ghostly Grub takes my basic party popcorn and turns it into a yummy Halloween treat made with some spooky ingredients.

Monday, September 17, 2012

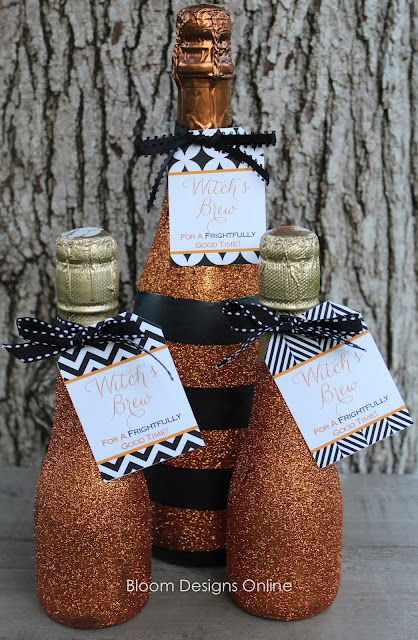
Make It Monday- Witch's Brew Bottles

Looking for a fun Halloween hostess gift or party favor?  These Witch's Brew Bottles are easy and quick to make and would work well for any holiday or party theme. It's a great way to glam it up this spooky season.

You need-

Wine or champagne- try to choose a bottle who's top coordinates with the colors you are using
Glitter- I use Martha Stewart's
Paint
painter's tape


Step 1- Remove labels and paint the entire bottle in a base color.


 Step 2- Let dry then tape off the lines or any pattern you like with painter's tape.  


Step 3- Paint the entire bottle again and immediately sprinkle on glitter.


Step 4- Peel off tape.  Use a small paint brush to touch up any mistakes.


Step 5- Attach ribbon and tag.


You can skip the painter's tape all together.  Just paint the entire bottle and cover with glitter when still wet.


As always, I am happy to share the tag with you free of charge if you
1. Are a member of Bloom- right sidebar or follow by RSS

2. Leave a comment with your email so that I can send you the file.

Also- consider liking Bloom on Facebook and following Bloom on Pinterest.

I had seen the idea for the glittered bottles on Pinterest but my daughter suggested making witches brew out of them.  So, credit for this should go to her.  Thanks Audrey! Off to a great week!?!
XO,
Jenny

Monday, September 10, 2012

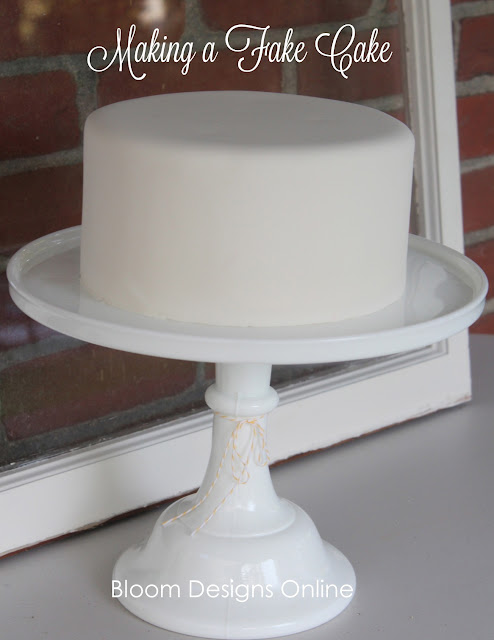
Make It Monday- Fake Cake

This may surprise you but not all of cake that you see on dessert tables are real.  Many, many years ago when I was planning my wedding, the cake lady suggested we do several fake tiers of cake and serve from a sheet cake in the back to save money.  I was very surprised and passed on this option but once I started planning dessert tables, the idea made sense.  I love using a big three tiered cake for center pieces on my tables.  The problem 1. Cakes, especially big ones, are expensive. 2. I usually don't have enough guests to justify ordering such a big cake.  3.  Having to make such an elaborate cake and decorate it last minute is SO STRESSFUL.

Though I was worried about whether or not it was "OK" to use a fake cake, I chose to do so for my apple of my eye party.  Best decision ever.  Then 2 months later, I received Amy Atlas' book in the mail and was so excited to see her tutorials on how to make one.  If Amy Atlas says it fine- it's fine.

The best part about making a fake cake is that they can be done way in advance and they are easy!  Your initial investment may be a bit pricey, but the cake can be reused again and again.  To store it, simply wrap it plastic wrap.  Here is a brief tutorial but I have never been to a baking or cake making class.  I know there are a lot of experts out there that may be more helpful.  DON'T BE INTIMIDATED BY FONDANT- IT IS JUST LIKE PLAY DOUGH!


You will need cake dummies found on amazon, fondant and wax paper.

I have used my hand to smooth the fondant but I found this fondant smoother for $4.00 at the cake store and it is amazing.  It makes your fondant much smoother and makes the job quicker.  It's well worth the investment. 


Roll the fondant between two pieces of wax paper until it is about 1/8 inch thick circle that is big enough to cover the top and most of the sides. 


Put the cake dummy in the middle of the fondant.  Flip the entire thing over and rest on top of a glass or other pedestal. The fondant will stretch down the sides and shrink to fit the almost magically.  Using a very light touch with your hands or the smoothing tool, rub the fondant smooth.  Trim any extra fondant that falls below the cake dummy with kitchen scissors or a knife.  


The fondant will dry and become hard making it very durable.  Once dried, stack and decorate.  I have used ribbon attached with straight pins in the back  and I have also used Necco Wafers.  You can cut shapes out of colored fondant or pipe with butter cream.  Options are endless. 

When you're done, the candies or ribbons pop right off.

You will be so happy you tried this.  Have a great week.  Don't forget to enter Friday's giveaway!
Halloween ideas are coming......
XO,
Jenny